This article may contain affiliate links. If you buy some products using those links, I may receive monetary benefits. See affiliate disclosure here
To update the contents of a blog like this, there are many simpler ways. Maybe I can just put all the content in markdown files and build the site with a static site generator like Hugo. So why complicate it?
The process I am going to describe below can feel a little over-complicated for a simple blog like this. Especially when considering that I am the only one changing the data. But I wanted a process that works well for larger applications as well, like an eCommerce site where data changes more frequently, from the user's end and from the admin end.
Why not an Admin Interface
My aim was to be able to efficiently update the content without having to depend on a complex admin interface, like the WordPress admin.
There are mainly two benefits to that: 1) security, 2) performance.
It is more secure because I don't need to run an admin interface where I (or other admins) can log in. So that reduces the attack surface.
Also, there is no performance cost of running a complex admin interface.
At the end of the day, an admin interface is just a wrapper to change some data living inside a database. For instance, all that the WordPress admin does is, giving you a GUI to update the data in the underlying MySQL/MariaDB database.
If there is a more efficient method to change that data, then the admin interface is not required.
But what is that efficient method?
Then What Else?
Answer is simple - SQL.
I've been spending some time to learn databases in detail, especially SQL databases, MySQL and MariaDB.
So I wanted to leverage that knowledge to do my work. That's another motivation.
DBeaver felt limiting
I had been using DBeaver to connect to the MariaDB server, locally on the staging area, and also to connect to the remote database server.
DBeaver offers a good enough UI. It also supports running direct SQL statements. So I use it to directly edit data on the local staging database, which is connected to the local staging site (localhost). For instance, suppose I have 5 posts to edit, 2 new posts, and a few tags and category changes. I can do all that on my desktop itself, and preview them on the localhost.
However, when it comes to replicating the changes from the local to the remote, it was a little cumbersome.
One obvious choice is to dump the database from the local, then perform a full restore on the remote. That will surely make all the changes live.
As far as this site is small, and I am the only one managing it, it works pretty well. The whole database is only a few megabytes, nothing more.
But as the site grows, when the database becomes a few hundred megabytes, or even gigabytes, this is not practical. Restoring such a large database every is not the right way to do it. It puts unnecessary pressure on the server, and also wastes bandwidth.
Incremental updates instead of full restores
So there needs to be an incremental way to update the data, rather than full restores.
Recording changes with DBeaver Query Manager
DBeaver has a feature called Query Manager. It can record all the statements that you've done. Then you can copy those statements from the local Query manager and run it on the remote database to replicate the changes.
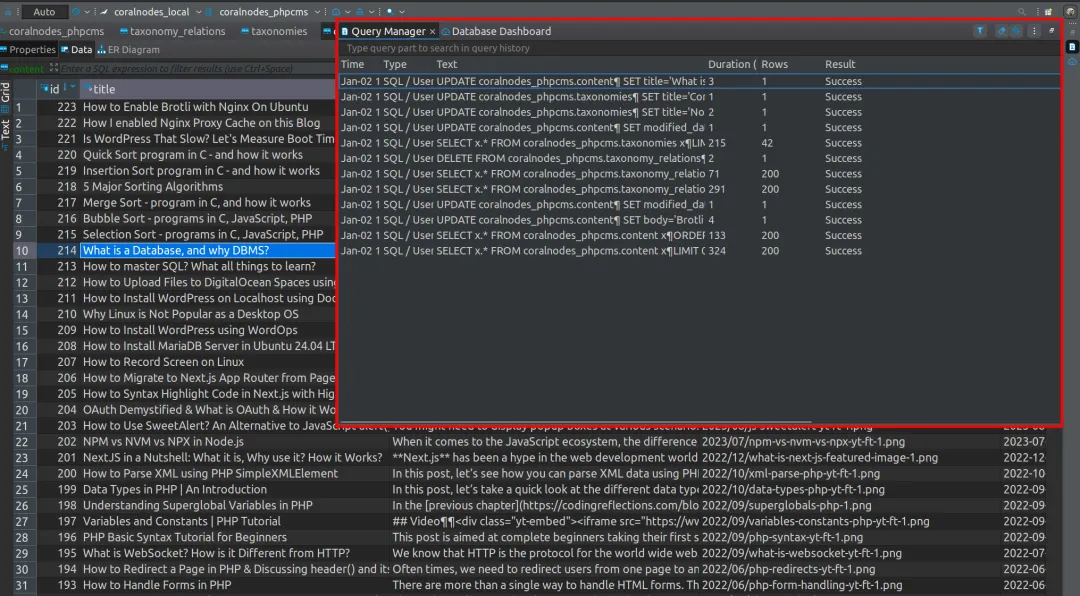
However, DBeaver Query Manager by default shows only the queries/statements run during the current session. That is, if you close and re-open DBeaver, the history is lost.
By the way, there is an option to enable logging. But overall, I don't quite like it. Because it logs all the queries, including SELECT statements. Whereas we need only the statements that modifies the data - INSERT, UPDATE, DELETE, and ALTER.
Native logging in MySQL/MariaDB
That's when I learned about the native logging feature in MySQL/MariaDB.
MySQL General Log
One is the general log, which stores all the statements that you run on the database server to a file, like general.log. To check if general log is enabled or not, you can run the command:
SHOW VARIABLES LIKE 'general_log%';I enabled it by adding the following lines to a new file located at /etc/mysql/mariadb.conf.d/my_custom.cnf.
[mysqld]
general_log = 1
general_log_file = /var/log/mysql/general.log
log_output = FILE
Then restart the Mariadb server.
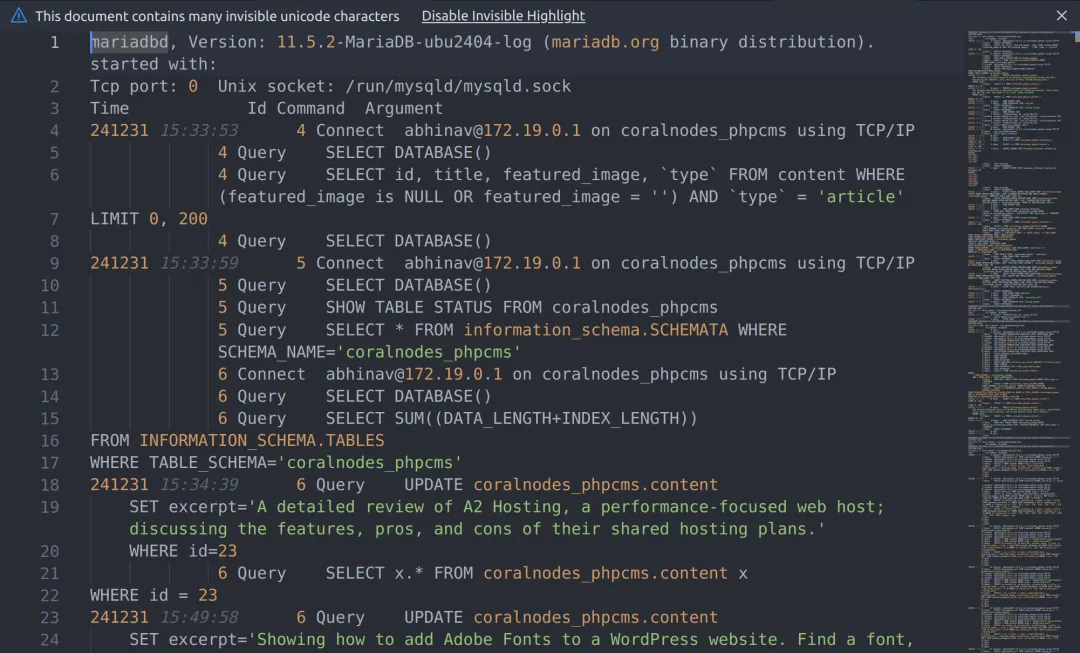
The general log is a text file that contains the details of all the statements, including SELECT. It looked a little complex for me.
So there should be another way.
MySQL Binary Logging
So, if you want to record only the statements that modifies the data, like INSERT, UPDATE, DELETE, and ALTER, you can enable something called binary logging.
log-bin=/var/log/mysql/binlog
binlog-format=STATEMENT
# Use STATEMENT format for detailed changes
server-id=1
# Required for binary logging
expire-logs-days=7
# Automatically delete logs older than 7 days
Then restart the server.
sudo systemctl restart mariadbFor me, the mariadb server is running inside a docker container, so I had to do a little more:
- create the
my_custom.cnffile in the host (in your project directory), an bind it to the container - also, store the directory
/var/log/mysqlto a docker volume, e.g.,mariadb-logs-volumeto persist the logs.
services:
    mariadb:
        image: mariadb:latest
        environment:
            MYSQL_ROOT_PASSWORD: ${DB_PASSWORD}
            MYSQL_USER: ${DB_USER}
            MYSQL_PASSWORD: ${DB_PASSWORD}
            MYSQL_DATABASE: ${DB_NAME}
        volumes:
            - myapp_db:/var/lib/mysql
            - ./my_custom.cnf:/etc/mysql/mariadb.conf.d/my_custom.cnf:ro
            - myapp_mysql_logs:/var/log/mysql
        ports:
            - "33096:3306"
        restart: always
volumes:
    myapp_db: {}
    myapp_mysql_logs: {}
Then restart the containers:
docker compose down
docker compose up -d
Then go to the container's terminal:
docker exec -it myapp-mariadb-1 bashNow when I checked inside the directory /var/log/mysql/ within the container with a simple ls -la command, I could find files that looked like:
binlog.000001binlog.000001.idxbinlog.indexgeneral.log
The files that look like binlog.000001 are binary files. So they are not directly readable. But it contains the full details of all the work that we've done.
Making use of binary log files with mysqlbinlog or mariadb-binlog
And to make it readable, I used a tool called mysqlbinlog. Since mine is Mariadb, it is mariadb-binlog. It converts the binary file to a text file.
So, if I go to the log directory and run the mariadb-binlog command over one of these log files, I will get the contents outputted in text onto the terminal.
cd /var/log/mysql
mariadb-binlog binlog.000001
To get only the lines for a particular database:
mariadb-binlog --database=myapp_db binlog.000001To save that output to a .sql file
mariadb-binlog --database=myapp_db binlog.000001 > binlog1.sqlThen exit from the container terminal:
exit;Now that we're in the host terminal and the log file is inside the container, copy that to the host machine:
docker cp myapp-mariadb-1:/var/log/mysql/binlog1.sql .Replicate changes to the remote database
Now, you can directly give that as input to the mysql or mariadb command to replicate the changes to the remote server.
Note: you may need to establish an SSH tunnel to the server to do this.
mariadb -h 127.0.0.1 -P 3307 -u root -p < binlog1.sql- the above command assumes that there is an active SSH tunnel setup from the local machine (that is my pc) to the server
- 127.0.0.1 is the localhost on my pc
- 3307 is the local port forwarded to the remote server
- connect as the
rootmariadb user to be able to replay the binary log (I tried with a non-root user, but access was denied - replaying requires some more privilieges than just access to database)
What we did here is called replaying a binlog file. It executes a series of recorded events to replicate the changes on the desired database.
How to perform the next update
Just before replicating a binary log file to the production, I usually flush the logs by running this command from the mariadb console:
FLUSH LOGS;This will end the previous file and starts a new one at the next index. For instance binlog.000001 will be closed and binlog.000002 starts, to which mariadb logs any new events. So I can safely replay binlog.000001 without worrying that it is being modified by mariadb.
Then when I want to replay binlog.000002, flush again to close it, which starts binglog.000003. Like that it goes.
As far as I understand, the maximum it goes is binlog.999999. It takes a long time to reach there. Even if that happens, you can reset the index back to 1.
Alternative approach to replaying the binary log file
However, replaying the binlog file like that requires a some extra permissions. A normal mysql user with permissions to access a particular database may not be able to replay a log file. You may see error like this:
That's why I did it with the root user.
But not everyone has access to the root user, or has extra privileges. In that case, you may want to trim down the binlog file to just the required statements. This requires some manual intervention.
Again start with the mariadb-binlog to process the binary log file.
mariadb-binlog --database=myapp_db --base64-output=DECODE-ROWS -s binlog.000001 > binlog1.sql- But still, the output can be lengthy, with all the details that you may not require. So, to get a shorter version of the same with just the important statements, you can add one more option
--short-formor simply-s. - You may want to decode any base64 strings in the file.
For me, the mariadb server is running locally inside a docker container. So I have to do a few more steps:
# get inside the docker container
docker exec -it myapp-mariadb-1 bash

# now inside the container's terminal:
cd /var/log/mysql

# run mariadb-binlog & save output to an sql file
mariadb-binlog --database=myapp_db --base64-output=DECODE-ROWS -s binlog.000001 > binlog1.sql

# log out from container, back to host terminal
exit

# copy the sql file from the container to the host
docker cp mariadb-logs-volume:/var/log/mysql/binlog1.sql .
This is how the file looked like, when opened in a text editor:
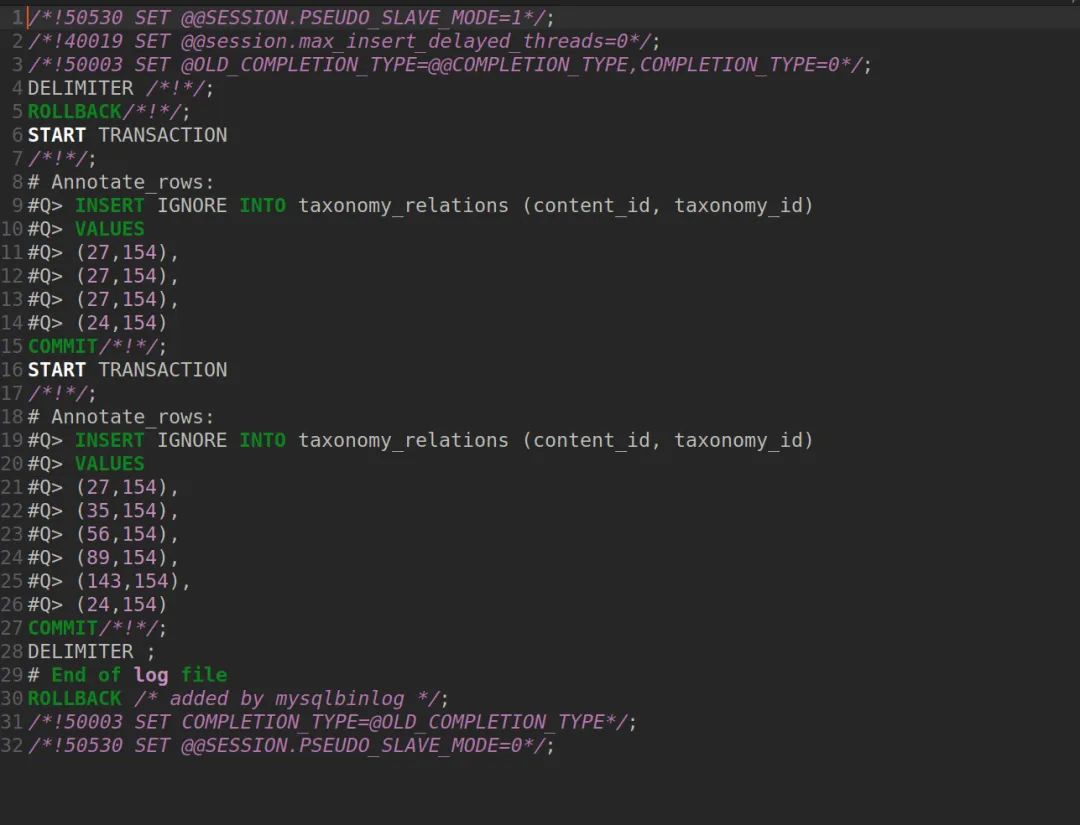
I just cleaned it up, and copied that to the DBeaver SQL console of the remote database.
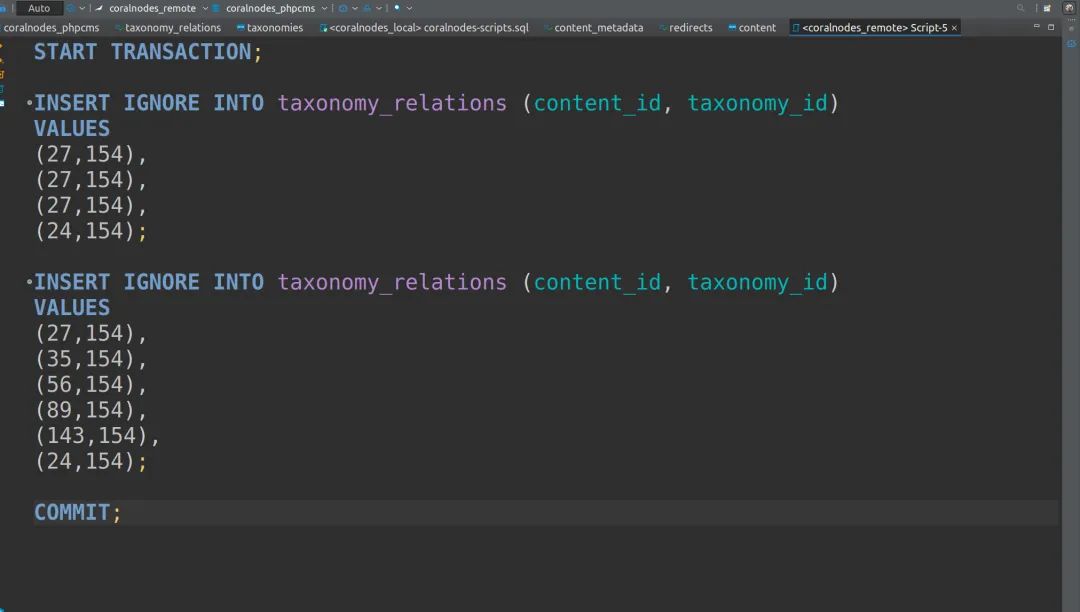
Then execute the script. It should work, and the changes should be replicated to the remote database. The script contains all the statements as a transaction, so even if some error occurs, data won't be corrupted.
Conclusion
Make sure that mariadb-binlog and the MariaDB server are the same version. If you're running mariadb-binlog on the server itself (like I did above), there won't be any issue. On the other hand, if you download/copy the binary file as it is from the server to your PC, and then convert it with mariadb-binlog on the PC, then your PC should run the same version of MariaDB client as the server.
Automating everything with a shell script
This workflow can seem a little complex. Part of it is docker's complexity. And it can be optimised here and there. So I decided to put all of those into a shell script:
#!/bin/bash

# Configuration
CONTAINER_NAME="myapp-mariadb-1"
TARGET_DATABASE="myapp_db"
LOCAL_PORT=3307
REMOTE_PORT=33096
OUTPUT_FILE="replicated_binlogs.txt"

# Input validation
if [[ $# -ne 1 ]]; then
  echo "Usage: $0 <start_binlog_number>"
  exit 1
fi

START_BINLOG=$1

# Step 1: Get the current binary log file name
END_BINLOG_FILE=$(docker exec -i $CONTAINER_NAME bash -c "mariadb -u root -p -e 'SHOW MASTER STATUS\G'" | grep File | awk '{print $2}')
if [[ -z "$END_BINLOG_FILE" ]]; then
  echo "Error: Could not retrieve the latest binary log file name."
  exit 1
fi
echo "Latest binary log file: $END_BINLOG_FILE"

# Extract the index number from END_BINLOG_FILE
END_BINLOG=$(echo "$END_BINLOG_FILE" | grep -oE '[0-9]+$')
if [[ -z "$END_BINLOG" ]]; then
  echo "Error: Could not extract the binary log index from $END_BINLOG_FILE."
  exit 1
fi
echo "Latest binary log index: $END_BINLOG"

# Step 2: Flush logs in MySQL
docker exec -i $CONTAINER_NAME bash -c "mariadb -u root -p -e 'FLUSH LOGS;'"
if [[ $? -ne 0 ]]; then
  echo "Error: Failed to flush logs."
  exit 1
fi
echo "Logs flushed."

# Step 3: Setup the SSH tunnel to the remote host (ensure it's running)
SSH_TUNNEL=$(pgrep -f "ssh -fN -L $LOCAL_PORT:localhost:$REMOTE_PORT")
if [[ -z "$SSH_TUNNEL" ]]; then
  ssh -fN -L $LOCAL_PORT:localhost:$REMOTE_PORT coralnodes.com
  if [[ $? -ne 0 ]]; then
    echo "Error: Failed to establish SSH tunnel."
    exit 1
  fi
  echo "SSH tunnel established on localhost:$LOCAL_PORT."
else
  echo "SSH tunnel already running."
fi

# Step 4: Loop through the specified range of binlog files
for i in $(seq -f "binlog.%06g" $START_BINLOG $END_BINLOG); do
  BINLOG_FILE="$i"
  SQL_FILE="$BINLOG_FILE.sql"

  echo "Processing $BINLOG_FILE ..."

  # Step 4.1: Convert binlog to SQL
  docker exec -i $CONTAINER_NAME bash -c "mariadb-binlog --database=$TARGET_DATABASE /var/log/mysql/$BINLOG_FILE > /var/log/mysql/$SQL_FILE"
  if [[ $? -ne 0 ]]; then
    echo "Error: Failed to convert $BINLOG_FILE to SQL. Skipping..."
    continue
  fi
  echo "Binary log converted to SQL: $SQL_FILE"

  # Step 4.2: Copy SQL file from container to host
  docker cp "$CONTAINER_NAME:/var/log/mysql/$SQL_FILE" .
  if [[ ! -f "$SQL_FILE" ]]; then
    echo "Error: Failed to copy $SQL_FILE from container to host. Skipping..."
    continue
  fi
  echo "SQL file copied to host: $SQL_FILE"

  # Step 4.3: Apply SQL file to the remote database
  mariadb -h 127.0.0.1 -P $LOCAL_PORT -u root -ppassword < "$SQL_FILE"
  if [[ $? -eq 0 ]]; then
    echo "SQL file applied to the remote database successfully."

      # Step 4: Append binlog filename to the output file
    if [[ -f "$OUTPUT_FILE" && -s "$OUTPUT_FILE" ]]; then
      # If the file exists and is not empty, add a comma before appending
      echo -n ",$BINLOG_FILE" >> $OUTPUT_FILE
    else
      # If the file is empty or doesn't exist, just add the binlog file name
      echo -n "$BINLOG_FILE" > $OUTPUT_FILE
    fi
    echo "Binlog file name appended to $OUTPUT_FILE."
  else
    echo "Error: Failed to apply $SQL_FILE to the remote database. Skipping..."
    continue
  fi

  # Cleanup: Optionally remove SQL files after processing
  rm -f "$SQL_FILE"
done

echo "All specified binlog files have been processed."
Saved it to a file named coralnodes_replicate.sh, and gave execute permissions. Then from the terminal, I can just run:
./coralnodes_replicate.sh 000012Most of the time, the changes might be spread across multiple binlog files. Because MySQL server creates a new binlog file whenever system restarts. Changes are made over multiple days that has to be replicated on to the remote server. Replicating just the latest binlog file alone is not sufficient.
So the above script accepts the starting index number as an argument, and replicates until the current one in order.
That's it! Changes are now live.
I also don't claim that it is the only correct way to do. Most importantly, the MySQL password is being hard-coded into the shell script. But it works for me because I don't plan to upload the script anywhere. And I could learn a handful of things along the way. That's why I though writing it down here can be useful so that I, or anyone else can refer it later.


