This article may contain affiliate links. If you buy some products using those links, I may receive monetary benefits. See affiliate disclosure here
Brotli is a highly efficient compression algorithm that can greatly reduce the size of your website's HTML, CSS, JavaScript, etc.
In another post, I'd written a detailed comparison showing Brotli performs against gzip, another popular compression algorithm used on the web. Brotli outperformed gzip almost always.
However, Brotli is not supported out of the box on Nginx. So you need to enable it yourself. There are a few ways to do that. And in this post, I'll show you how I did it by following the instructions given on this page.
Steps to enable Brotli in Nginx
In my case, I already had Nginx web server running. So I needed to enable the Brotli module with the existing Nginx installation rather than performing a fresh installation.
1. Download the necessary dependencies
My server was running Ubuntu 22.04 LTS. And I had to install the following tools.
sudo apt update
sudo apt install \
    build-essential \
    zlib1g-dev \
    libpcre3 \
    libpcre3-dev \
    unzip \
    git \
    cmake
2. Download the appropriate Nginx version
Upon checking the existing version, I could identify that I was running Nginx v1.18.0, a few versions behind the currently available stable version, as of writing this post.
nginx -vThe next step is downloading that particular version from the Nginx website. I downloaded it to my home folder. Then extracted the archive.
cd /home/abhinav/
wget https://nginx.org/download/nginx-1.18.0.tar.gz
tar -xzf nginx-1.18.0.tar.gz
3. Cloning the ngx_brotli module
Next, clone the ngx_brotli module from Google's GitHub repository.
git clone --recurse-submodules -j8 https://github.com/google/ngx_brotli4. Build ngx_brotli module
Once it is cloned, we need to build the module.
cd /home/abhinav/ngx_brotli/deps/brotli

mkdir out && cd out

cmake -DCMAKE_BUILD_TYPE=Release -DBUILD_SHARED_LIBS=OFF -DCMAKE_C_FLAGS="-Ofast -m64 -march=native -mtune=native -flto -funroll-loops -ffunction-sections -fdata-sections -Wl,--gc-sections" -DCMAKE_CXX_FLAGS="-Ofast -m64 -march=native -mtune=native -flto -funroll-loops -ffunction-sections -fdata-sections -Wl,--gc-sections" -DCMAKE_INSTALL_PREFIX=./installed ..

cmake --build . --config Release --target brotlienc

cd /home/abhinav/
5. Backup the existing Nginx configuration
It is always a good idea to take a backup of your Nginx configuration, in case something goes wrong.
sudo cp -r /etc/nginx /etc/nginx.backup 6. Find the current Nginx build configuration
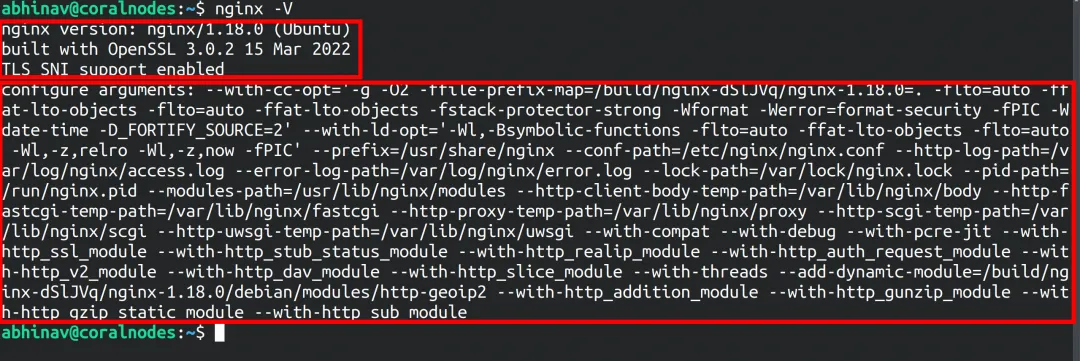
Now, we need to find out the arguments with which our existing Nginx instance was built. For that you can run the nginx -V command. This will help us to correctly rebuild Nginx later.
nginx -VUpon running the command, I could see that Nginx was compiled with a couple of modules as you can see in this screenshot:

In order to rebuild it with the same configuration later, I had to install one more package - libssl-dev, which was currently missing on my system. When I tried without this package, the configure (next step) was exiting with an error.
sudo apt install libssl-dev7. Configure the Build
Now we're ready to configure the new build. So first, move to the downloaded Nginx folder.
Then add all the previous configure arguments, plus the new module - --add-dynamic-module=/home/abhinav/ngx_brotli
cd /home/abhinav/nginx-1.18.0/

./configure \
    --with-cc-opt='-g -O2 -ffile-prefix-map=/build/nginx-dSlJVq/nginx-1.18.0=. -flto=auto -ffat-lto-objects -fstack-protector-strong -Wformat -Werror=format-security -fPIC -Wdate-time -D_FORTIFY_SOURCE=2' \
    --with-ld-opt='-Wl,-Bsymbolic-functions -flto=auto -ffat-lto-objects -Wl,-z,relro -Wl,-z,now -fPIC' \
    --prefix=/usr/share/nginx \
    --conf-path=/etc/nginx/nginx.conf \
    --http-log-path=/var/log/nginx/access.log \
    --error-log-path=/var/log/nginx/error.log \
    --lock-path=/var/lock/nginx.lock \
    --pid-path=/run/nginx.pid \
    --modules-path=/usr/lib/nginx/modules \
    --http-client-body-temp-path=/var/lib/nginx/body \
    --http-fastcgi-temp-path=/var/lib/nginx/fastcgi \
    --http-proxy-temp-path=/var/lib/nginx/proxy \
    --http-scgi-temp-path=/var/lib/nginx/scgi \
    --http-uwsgi-temp-path=/var/lib/nginx/uwsgi \
    --with-compat \
    --with-debug \
    --with-pcre-jit \
    --with-http_ssl_module \
    --with-http_stub_status_module \
    --with-http_realip_module \
    --with-http_auth_request_module \
    --with-http_v2_module \
    --with-http_dav_module \
    --with-http_slice_module \
    --with-threads \
    --add-dynamic-module=/home/abhinav/ngx_brotli
Note that we're adding it as a dynamic module. You could also make it static, but that would require us to build Nginx into a single binary with all the modules. Whereas dynamic keeps them separate, so updating and managing will be easier
8. Rebuild Nginx Modules
Run the make command to rebuild Nginx with the new configuration:
make modulesIf everything goes well, the modules will be rebuilt as per the arguments passed to ./configure.
Note that we're only rebuilding the modules, not the entire Nginx. If you want to fully rebuild Nginx with the new configuration, you can run the following commands instead:
make
make install
The make install command will replace the current Nginx installation with the new one. But we don't need it. We only need to get the modules.
9. Copy the Shared Object (.so) Files to the appropriate location
Now if you check inside the objs folder, you will find some newly generated .so files. I had to move them to /usr/lib/nginx/modules.
ls objs

sudo cp objs/ngx_http_brotli_filter_module.so /usr/lib/nginx/modules/
sudo cp objs/ngx_http_brotli_static_module.so /usr/lib/nginx/modules/
10. Update the Nginx Configuration File
Now that the Brotli module is in place, we need to link it from the Nginx configuration file. So open it in the nano or micro editor.
sudo micro /etc/nginx/nginx.confNow, outside the http block, load the modules:
load_module modules/ngx_http_brotli_filter_module.so;
load_module modules/ngx_http_brotli_static_module.so;
Then inside the http block, add the compression settings:
http {
   # Brotli Settings
   brotli on;
   brotli_static on;
   brotli_comp_level 6;
   brotli_types text/plain text/css application/json application/javascript text/xml application/xml application/xml+rss text/javascript;

    # remaining settings...
}
11. Restart Nginx
Check the configuration and restart Nginx for the changes to take effect:
sudo nginx -t
sudo systemctl restart nginx
12. Verify if it's Working
Just send a curl request to one of the sites running under our Nginx web server.
curl -H "Accept-Encoding: br" -I https://mysite.comThe returned headers should contain content-encoding: br, which verifies that Brotli compression is working as expected.
Caution when updating Nginx in the future
Here I've built the brotli module with Nginx v1.18.0. So if I update Nginx to a later version, I need to rebuild the brotli module again with that version. Otherwise, there will be a module version mismatch, and Nginx will stop working.
Once when I updated the system packages from the Ubuntu Packages manager, Nginx got updated to 1.26.2, and this happened:

So I had to re-download Nginx 1.26.2 and redo the above steps to make it working.
To avoid this situation, you can hold Nginx to a particular version, so that system updates won't update Nginx.
sudo apt-mark hold nginxNow, when you intentionally want to upgrade Nginx, un-hold it, perform the upgrade, and hold again:
sudo apt-mark unhold nginx
sudo apt update
sudo apt upgrade nginx
sudo apt-mark hold nginx
To view the list of packages on hold, run the command:
apt-mark showholdConclusion
This is just one method to enable Brotli compression. I had also read somewhere that there is a PPA that makes it easier on Ubuntu. There is also a docker image for Nginx with Brotli enabled, but I haven't looked into it. So far, the above method is working fine for me.
Moreover, if you are using a CDN with full page caching, like Cloudflare, chances are that your content is already compressed with Brotli before being sent to visitors.
Another compression algorithm seen these days is zstd, and it said to be faster in compressing and decompressing. But as far as I know, zstd is not as widely supported by browsers as Brotli or gzip.


