Next.js has been a hype in the web development world since its initial release in 2016.
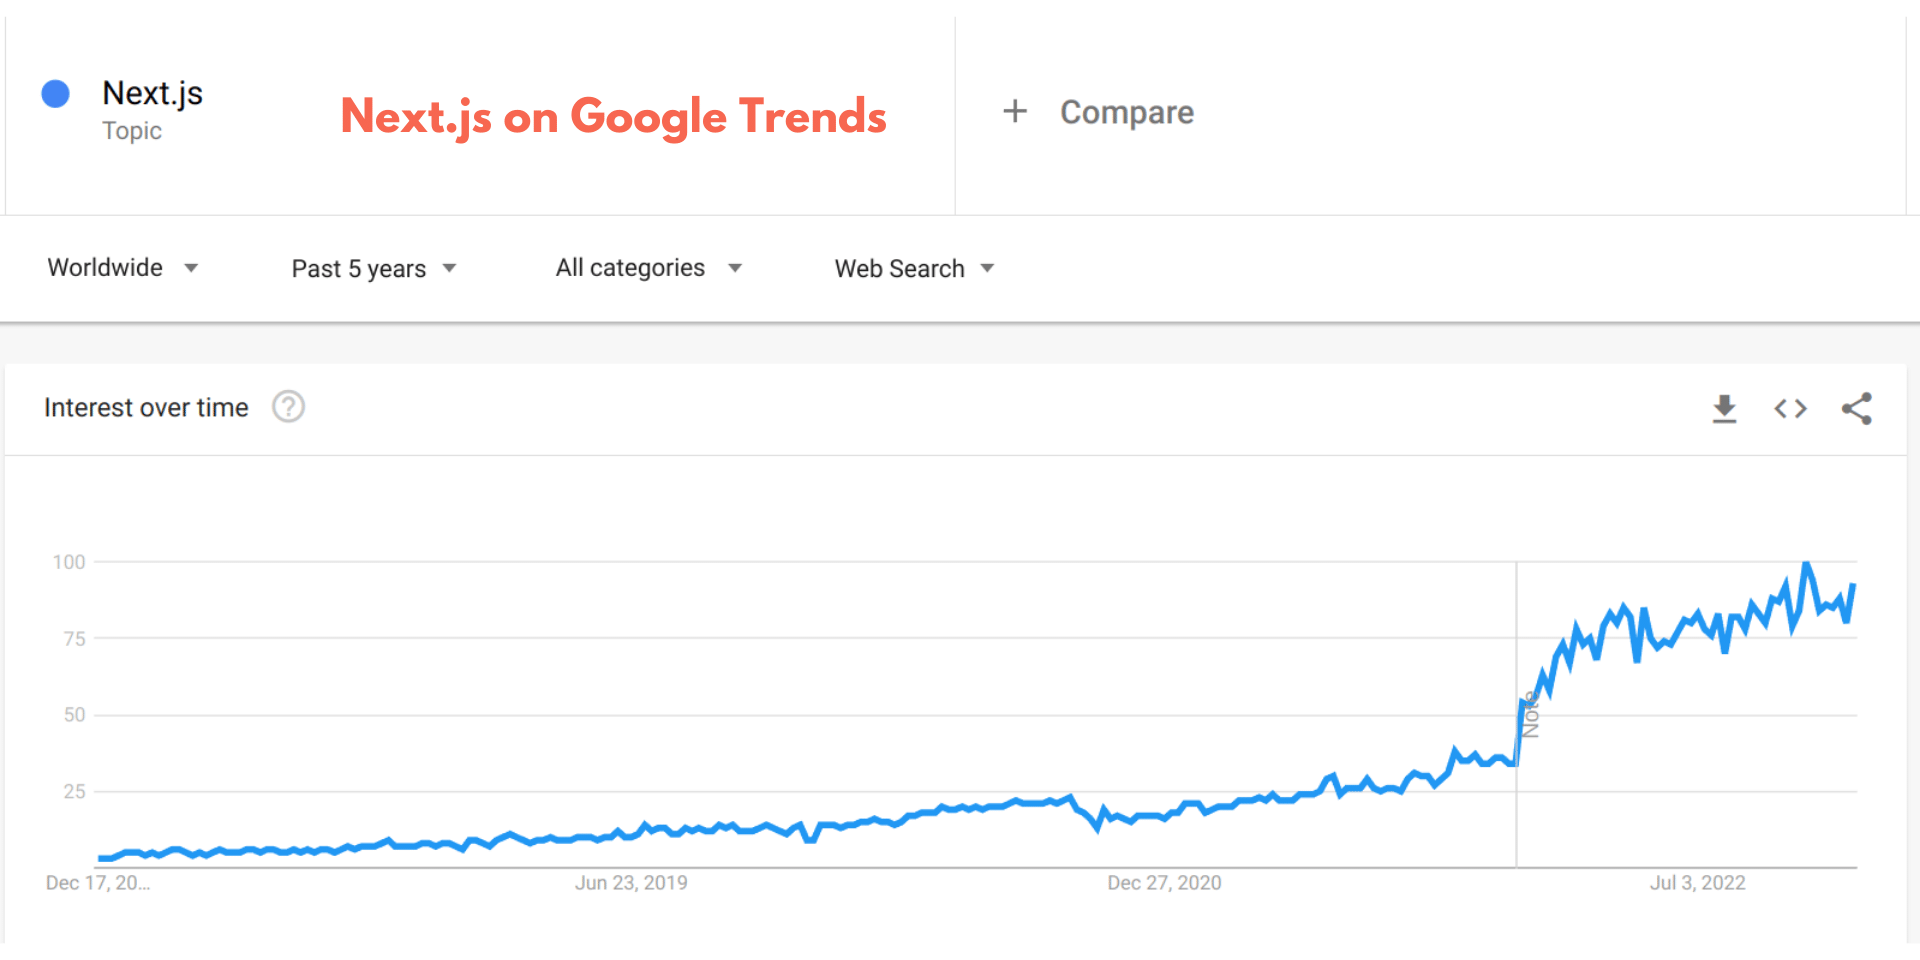
However, if you are not familiar with frontend technologies like React, Next.js might seem a bit difficult to get into at first.
So, if you are feeling the same and having a hard time wrapping your head around the idea, this post is for you. I will try to demystify what Next.js is, and how it works in as simple words as possible.
Watch Video
- I’ve also made a playlist showing how to build a headless WordPress site using Next.js – take a look at that also.
React on the server with Next.js
In its essence, Next.js is a web application framework, which allows you to run React on the server.
But wait, React is a frontend Javascript library to make interactive UIs, right? So, what’s the point of running it on the server?
That’s where the idea of client-side rendering (CSR) and server-side rendering (SSR) comes in. By default, React renders pages on the client, which is usually the user’s browser.
For instance, suppose you have a blog made using React. The server will only send the necessary Javascript files to the client along with the basic HTML markup. It will not include the full content, that is, the blog posts. It’s the job of the Javascript code to fetch all the data and render it accordingly (rendering the React components) and make the app interactive. And this approach can be bad for SEO.
That’s the problem Next.js tries to solve. It’s a Node.js application that runs React on the server to generate fully-rendered static HTML pages before sending it to the client. So the markup the browser (or the search engine spider) receives contains the rendered content as well, not just the HTML skeleton and a bunch of Javascript code. It also reduces the load on the client’s machine, especially for users on less-performant devices.
In short, Next.js allows you to build static HTML websites.
Next.js vs Static Site Builders
But then, why not use a static site generator like Hugo or Gatsby? How is Next.js different from them?
That’s where the idea of server-side rendering comes. Next.js is not just a static site generator. It mainly supports three forms of pre-rendering HTML pages:
- Server-side rendering (SSR)
- Static Site Generation (SSG), and
- Incremental Static Regeneration (ISR)
Server-side rendering (SSR) renders a page only when a request comes in for that page. It is useful for retaining the dynamic nature of web pages, for instance, think of a social media feed page that changes every now and then, or the home page of a buzzing eCommerce store.
Whereas static site generation (SSG) generates all the pages in advance during build time (when you run the npm run build command). It is used for sites with pages that do not change much, for instance a blog.
The Incremental Static Regeneration (ISR) feature is used to update pages one by one. This can be useful when you update an existing post or publish a new one. You can just regenerate that particular page instead of building the whole site. Whereas with traditional static site generators, you have to build the entire site whenever you change even a single page.
You can set the revalidation frequency within the application code to let Next.js know when to rebuild a page. For instance if you set the revalidate property of the home page to 60 seconds, Next.js will refetch the data from the backend and re-render the page when a new request comes in after that time period. The revalidate property can be set on a per page basis.
Overall the revalidation feature makes sure your pages stay up to date with the content without the need to rebuild the entire site.
In addition to all these, later versions of Next.js also supports on-demand revalidation. With that, you can notify the Next.js server along with the path of the page to be regenerated.
How it Works
So, Next.js runs on its own server, listening for connections and sending responses using the Node.js webserver. The default HTTP port is 3000 (the server is started when you run the npm run start command).
The architecture of a typical Next.js application looks like this:
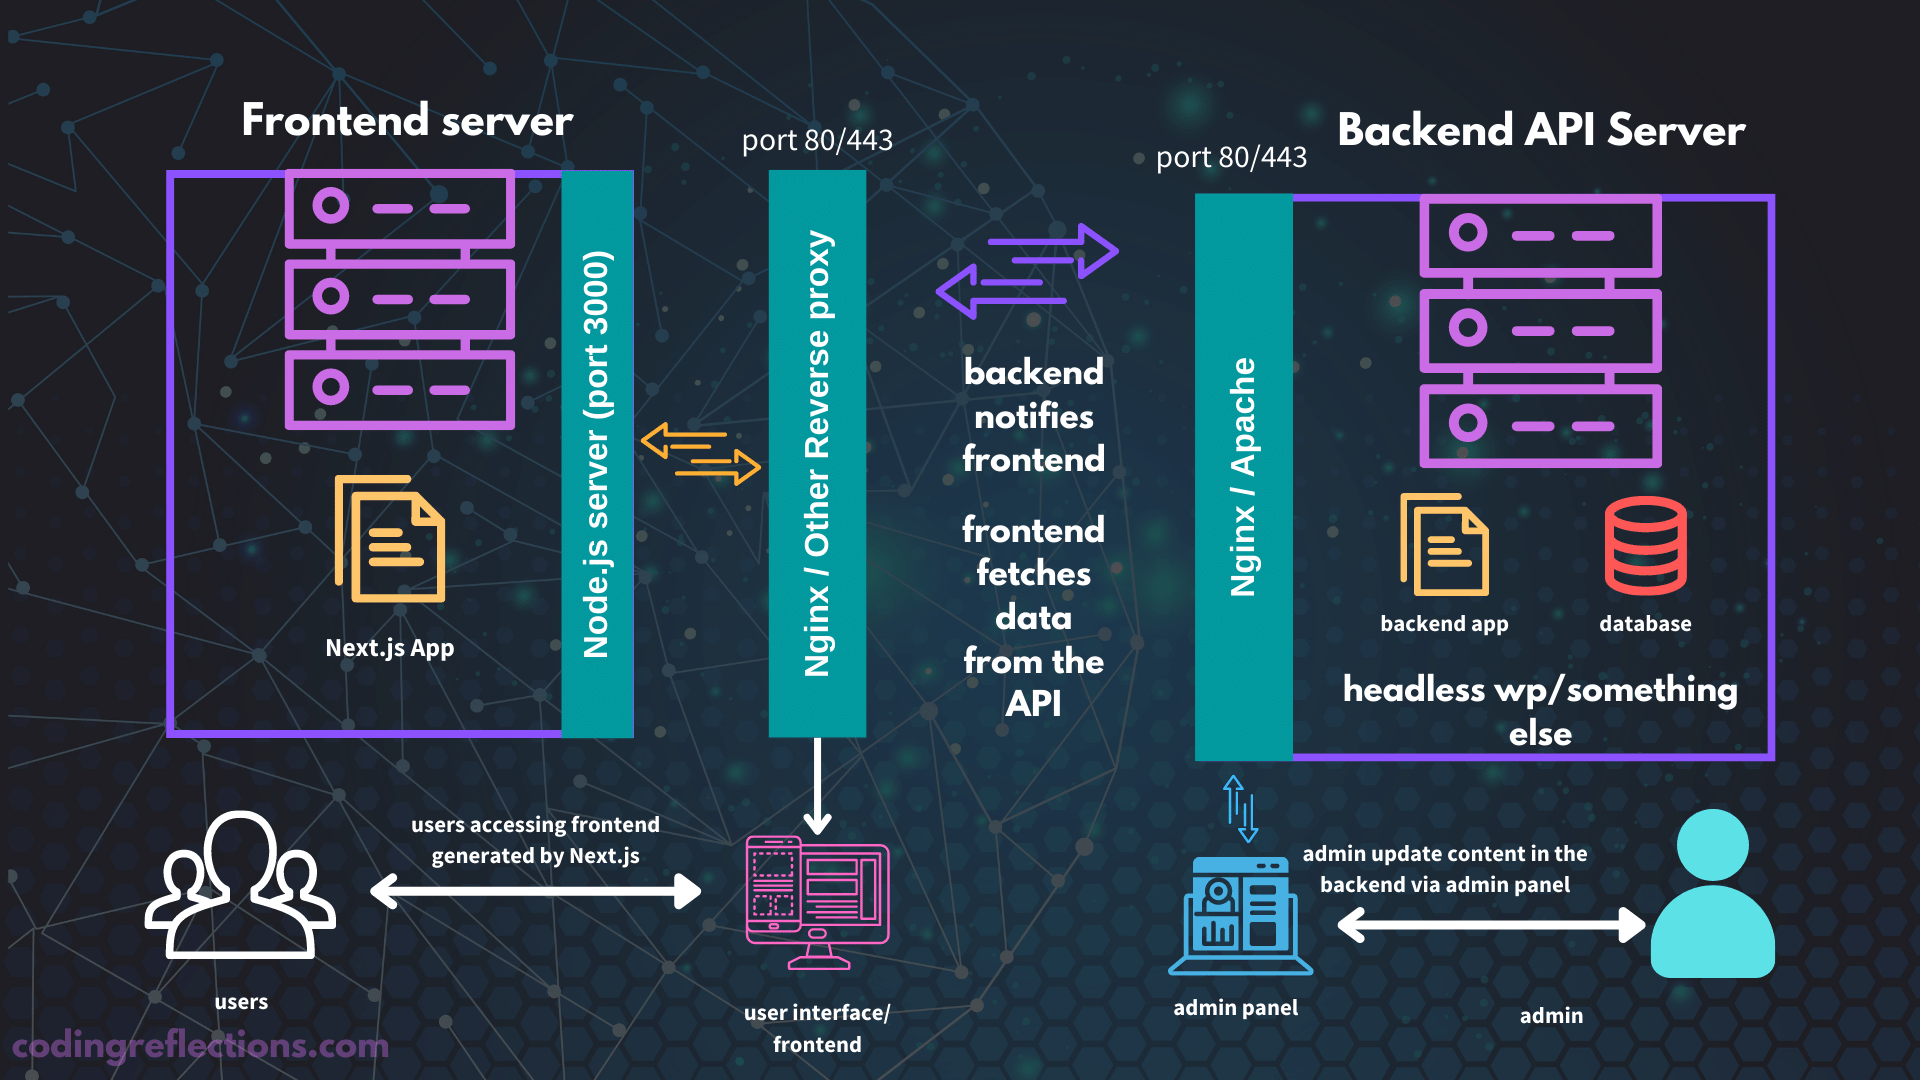
You can see that it’s a little more complex than traditional sites, because it involves two servers – one for the frontend and another for the backend.
Plus, if the code is cloned from a remote GitHub repo, that too will be added to the mix.
However, it’s not a necessity. You can also run Next.js on your local machine as a simple static site generator (with content written in Markdown files instead of storing in a backend database).
But in my opinion, using Next.js for such a simple purpose is an overkill. Because you are not using the power of server side rendering or incremental static regeneration. You could easily get away with something simpler, like Jekyll or Hugo.
Project Structure
Now, let’s see how a Next.js project looks like:
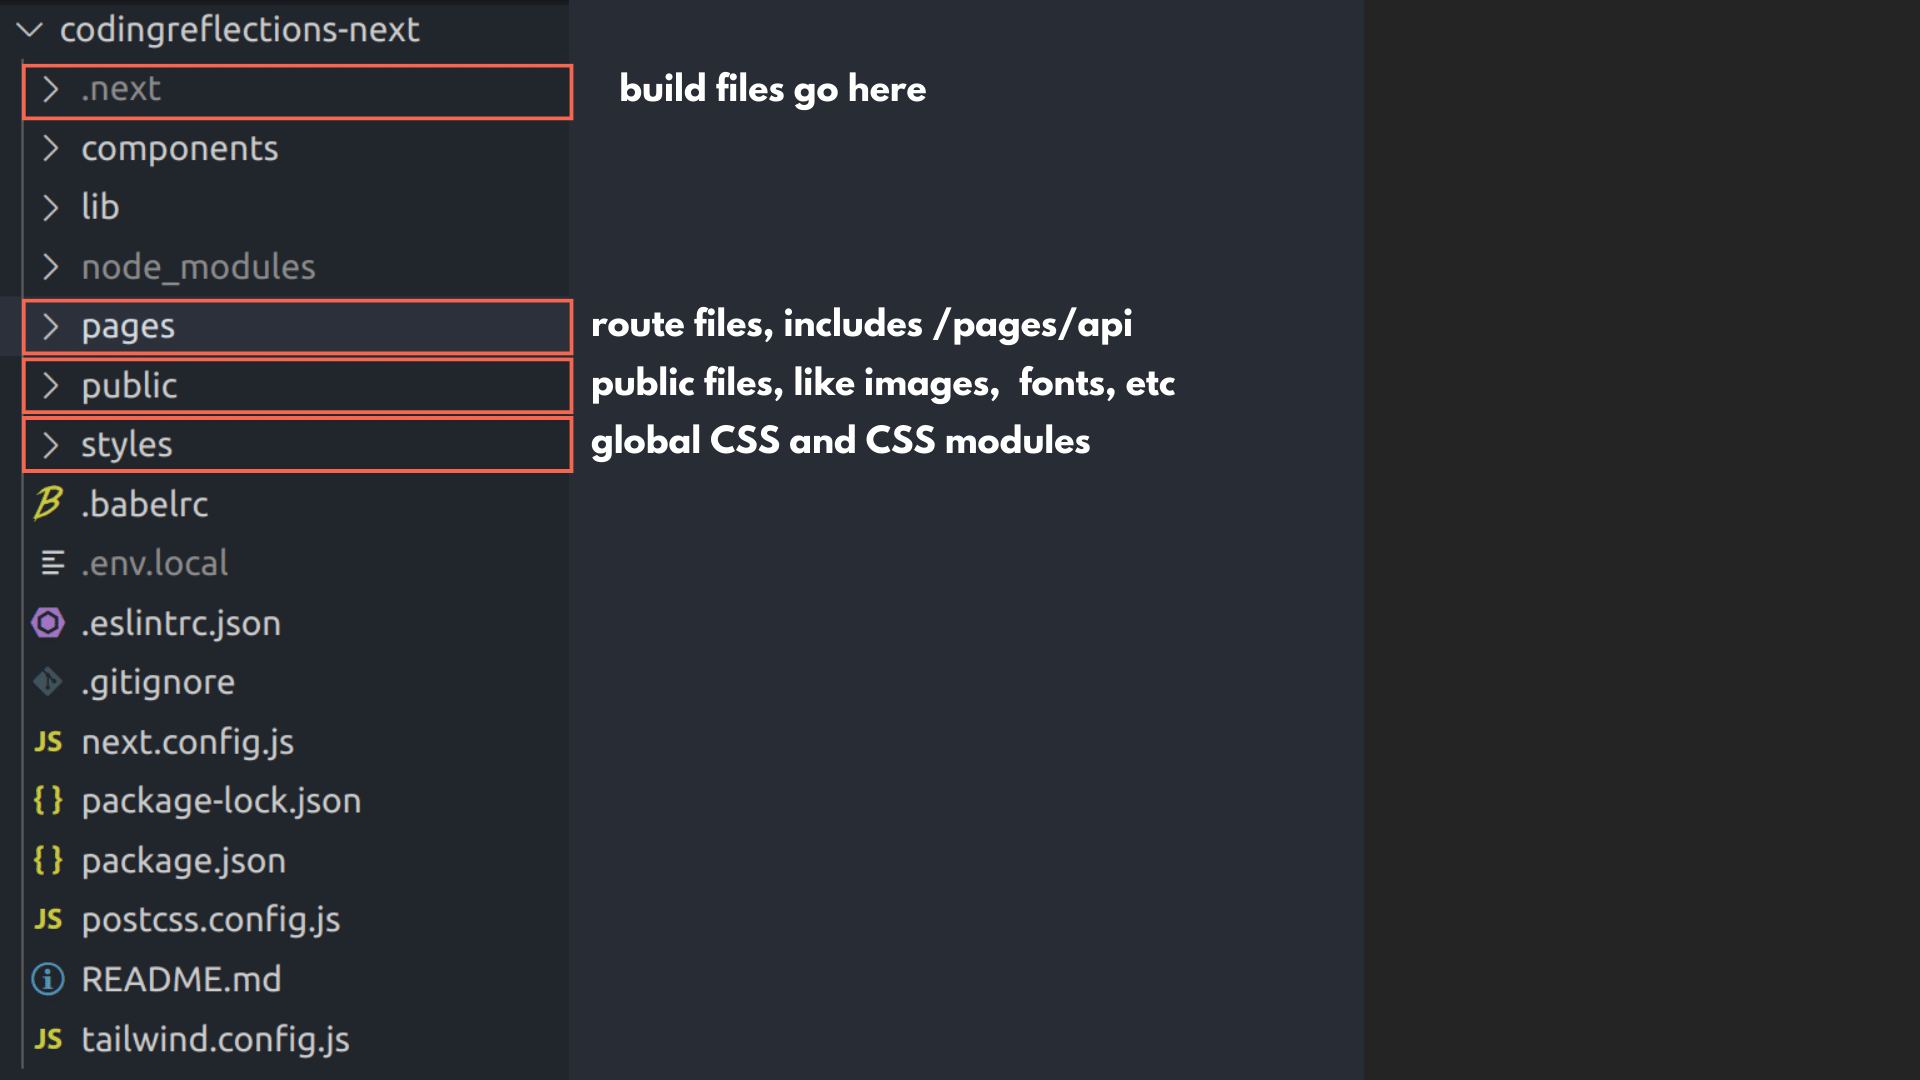
The /pages directory
In a Next.js project, all the pages and the routes go inside the /pages directory. For instance, if you define a file called about.js inside the pages directory Next.js will automatically render it as a page on your site.
And each page or route is actually a React component which returns the output, that means, the HTML markup and the content in JSX format. If you are familiar with React.js then it will be a no-brainer.
In addition to static routes, you can also define dynamic routes. The difference is in the file naming. For static routes, just name the route file as usual – like about.js or contact.js. Whereas for dynamic routes, put the name inside square brackets – like [post].js, [product].js, etc.
The /pages/api directory
Within the /pages directory, you can find another directory called /api inside a Next.js project. It’s for you to put any server-only routes. Next.js will not render them as pages on your site. But you can send API requests and responses with these API routes. An example use case is when you want to manage for submissions from a contact form. Or when you want to send data to a third-party API.
On-demand revalidation also makes use of this /api directory. For example, you can create a file called revalidate.js inside the /api directory to receive notifications from WordPress to let Next.js know when a post is published or updated on the backend. Based on that information, Next.js can re-build that page.

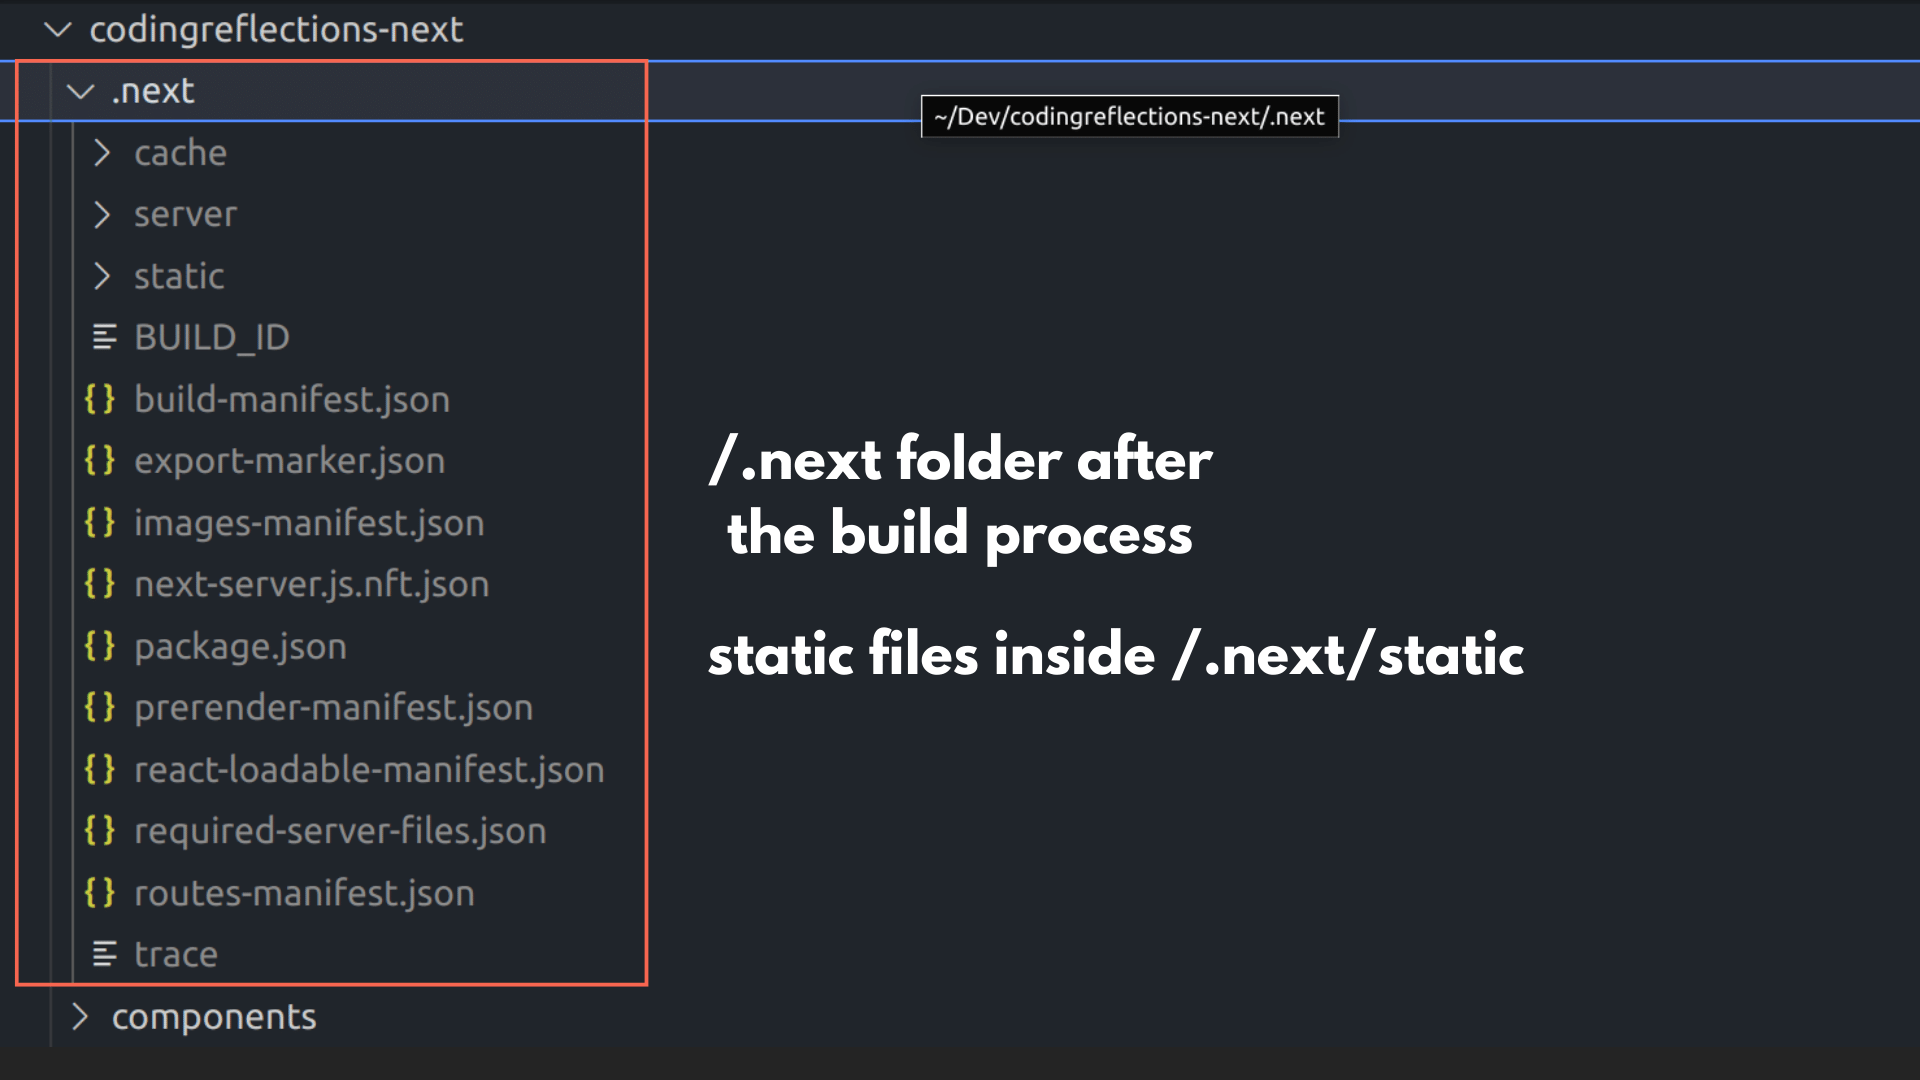
Static files inside the /.next/static folder
Once you build the application using the npm run build command, the static HTML files along with all the necessary assets like CSS, JS, etc go inside the /.next/static directory. The Node.js server automatically maps to this directory once you publish the site.
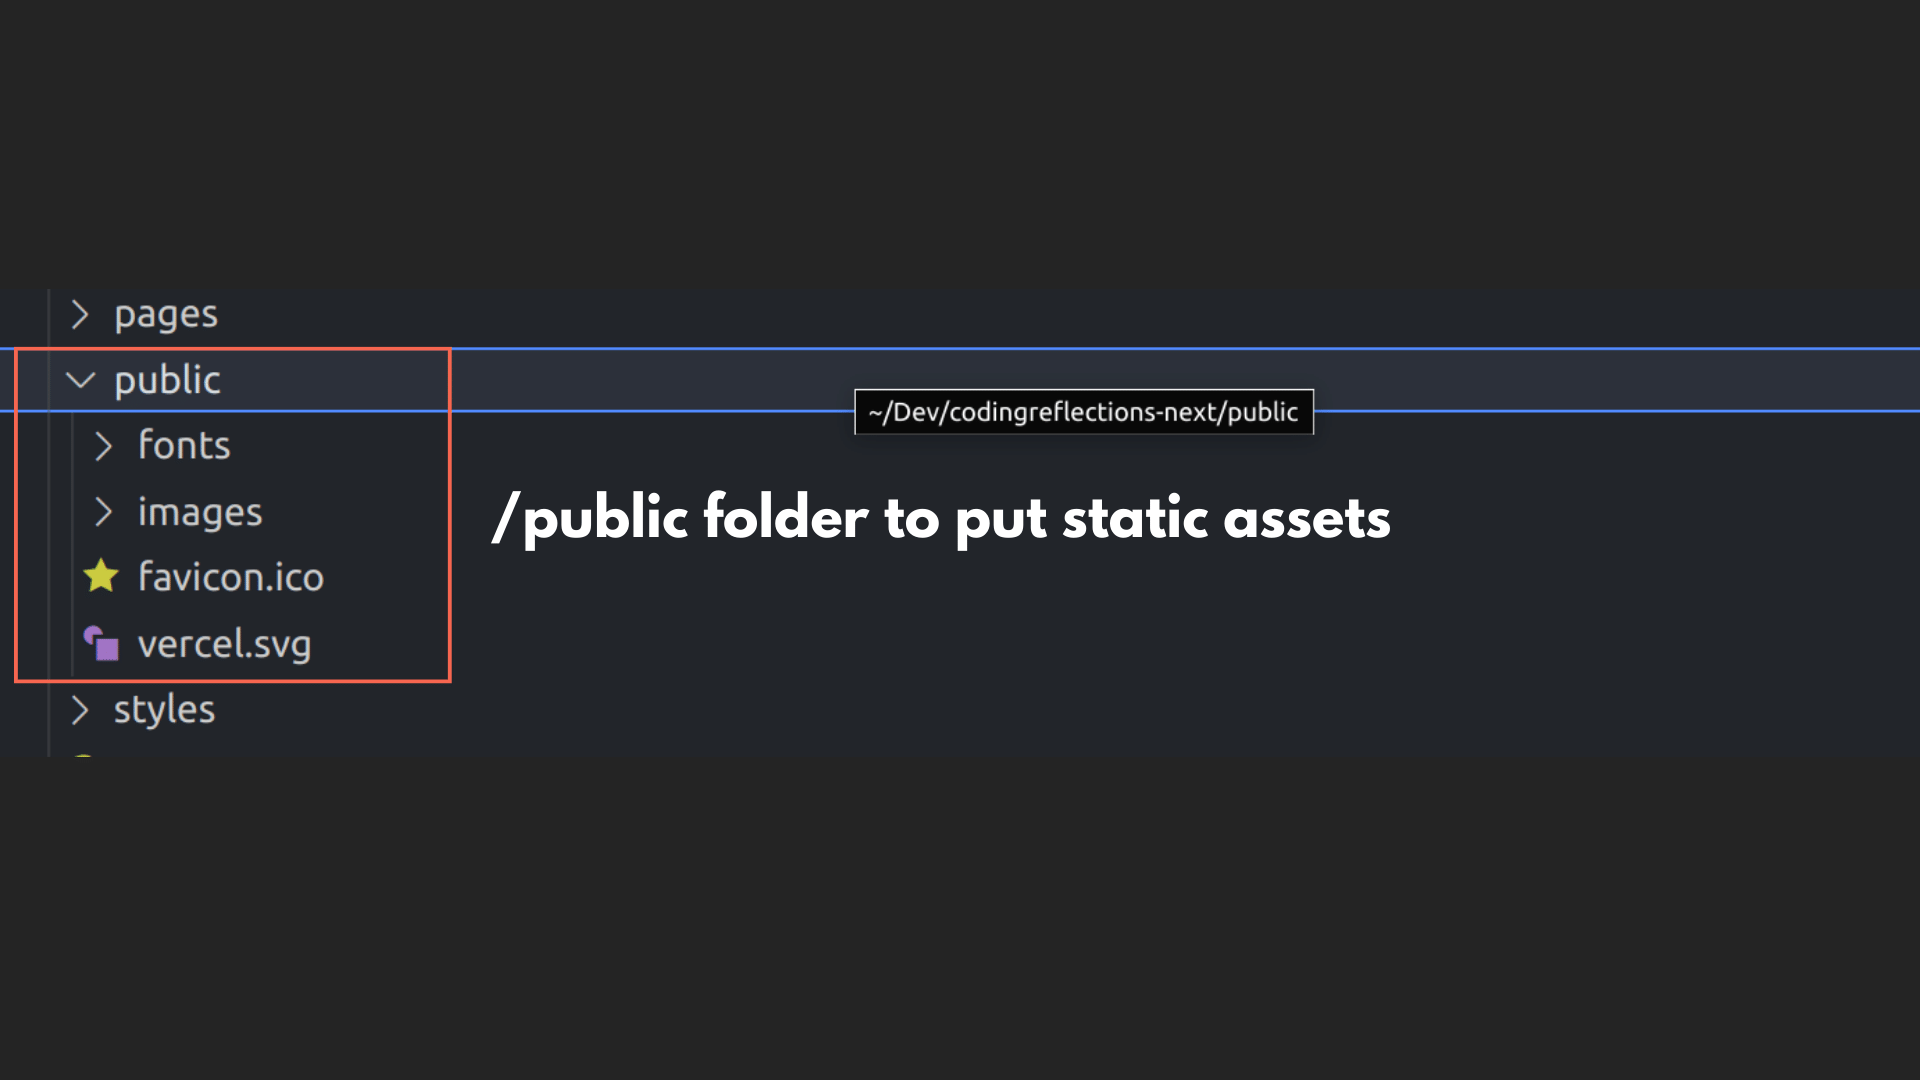
/public directory for static files like images
Within the project root, there is another directory called /public where you can put images, fonts, and other such assets required for the site. The Node.js server serves any files from this directory on the site’s frontend. For instance, if you have a file called /public/logo.png, it will be accessible from the URL – youriste.com/logo.png.
Styles directory
Also, the site’s CSS files are usually put within the /styles directory. Both global css as well as scoped css modules can be put here.
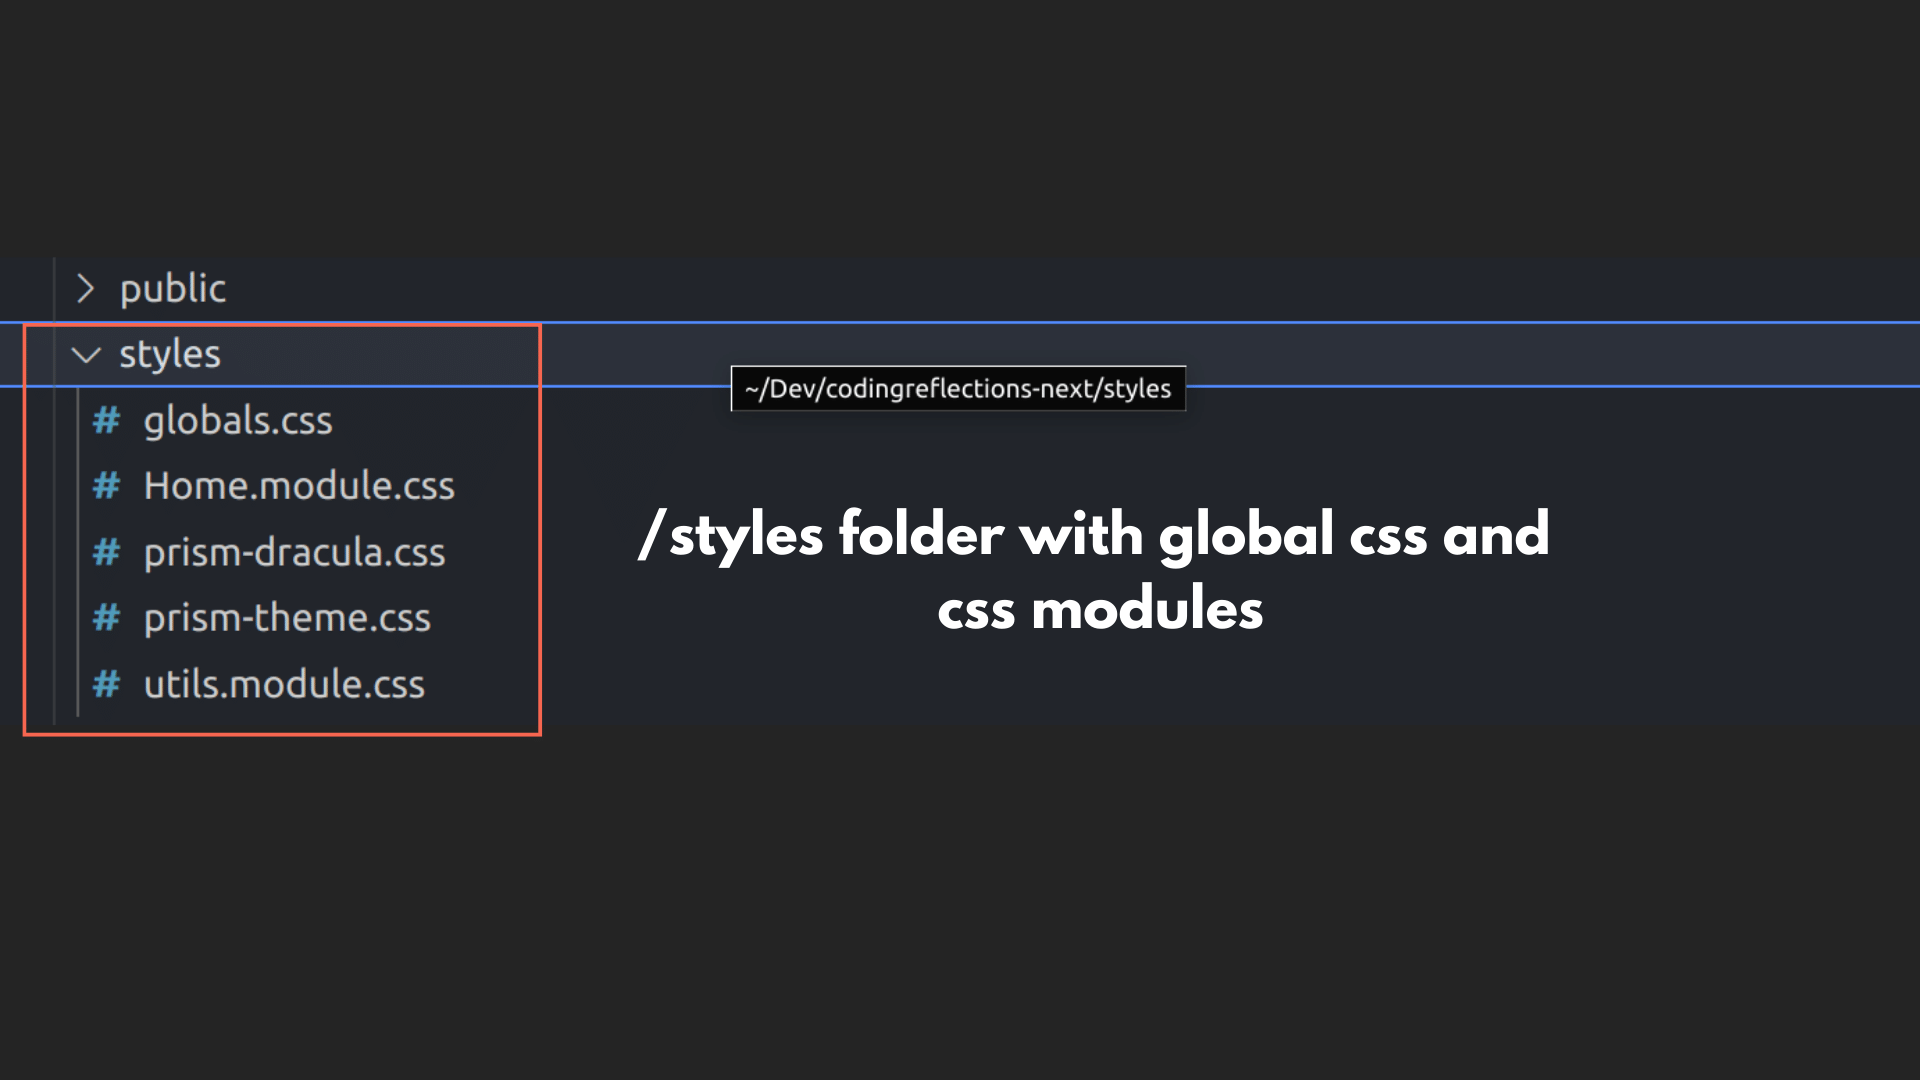
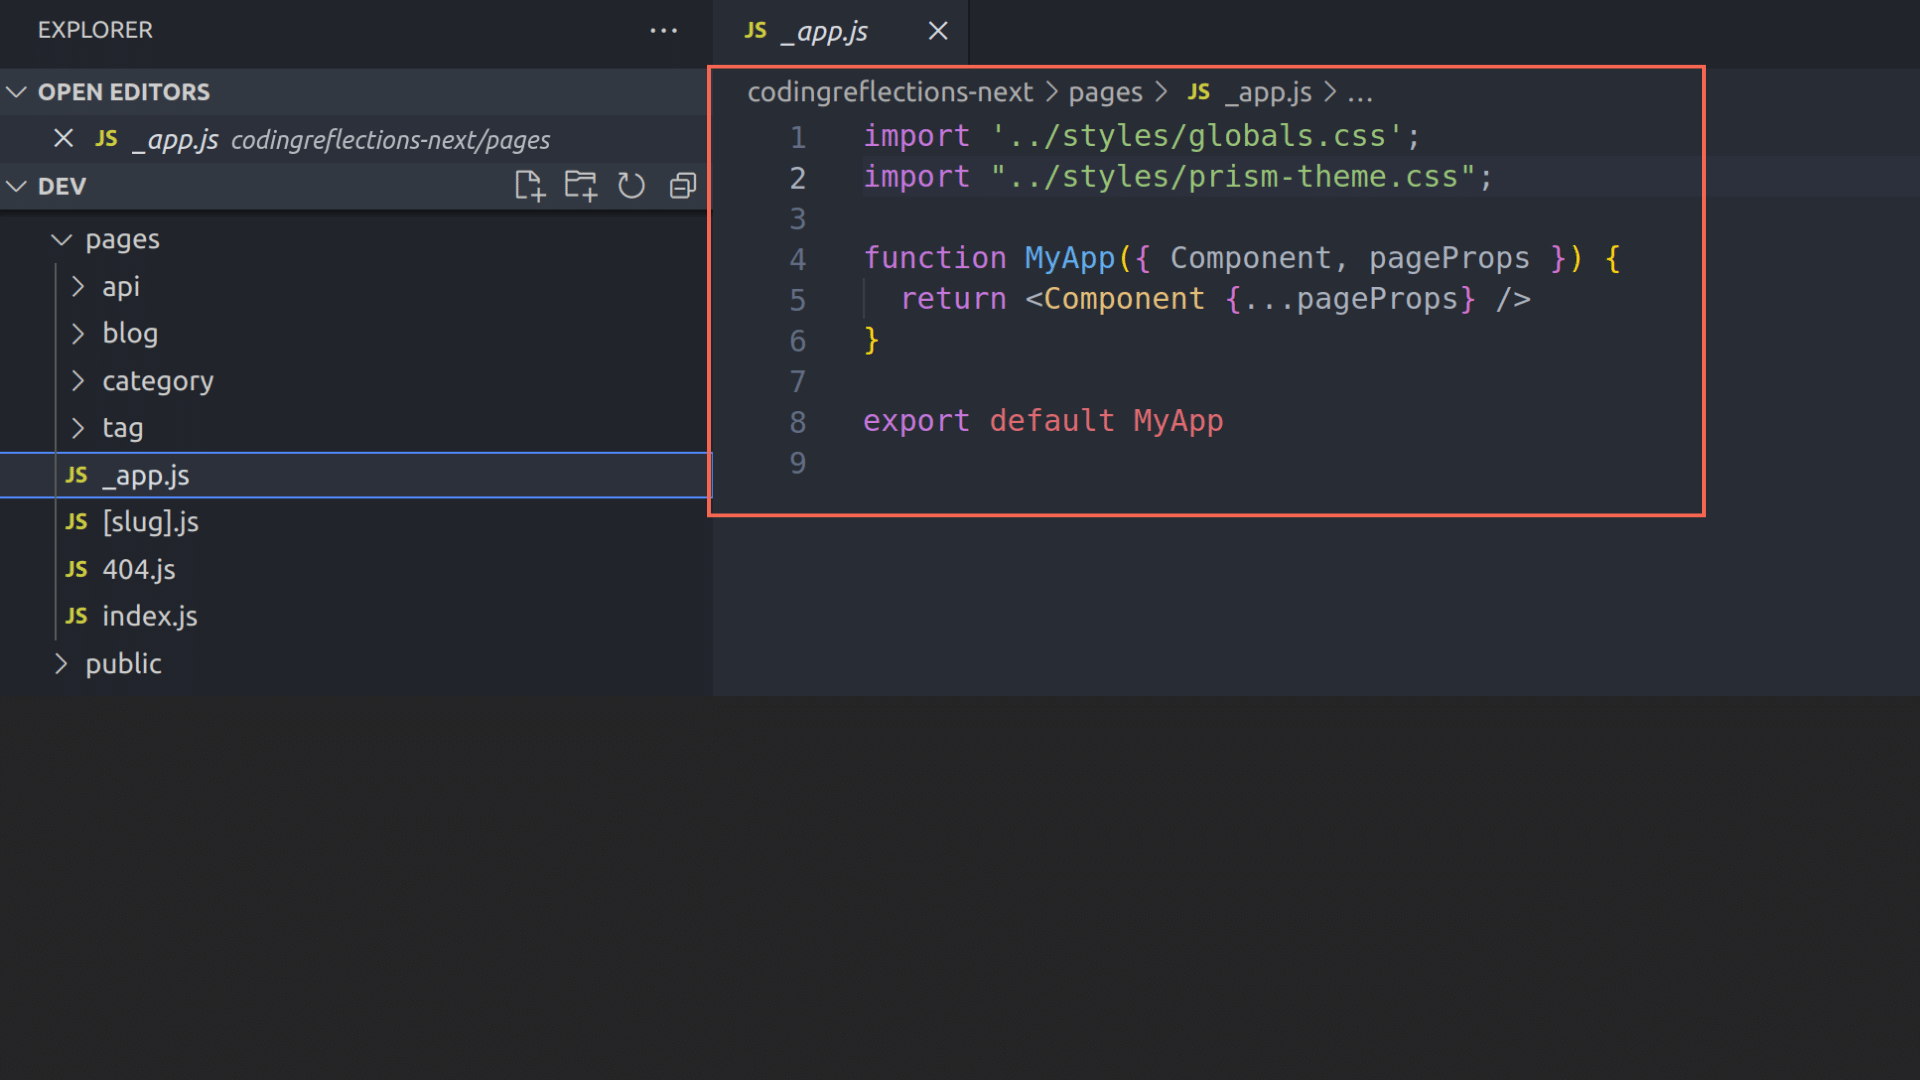
The file – globals.css – includes the CSS rules applicable to your whole site. It can be imported to the _app.js file located in the project root to make it available to all the routes and components.
In the case of of scoped CSS files (like home.module.css), you can import them to individual pages. Next.js will take care of generating unique CSS class names to avoid name collisions.
getStaticProps(), getSeverSideProps(), and getStaticPaths()
Next.js provides two functions to populate a page with data during pre-rendering. For instance, you want to supply the blog home page with a list of the recent ten posts.
For such puposes, you can use the following functions:
getStaticProps(), andgetServerSideProps()
Any data returned by these two functions will be available as props (parameters) to the component function.
For the programmer, both the functions are almost the same. The former is used for statically generated pages (SSG), while the latter is for server-side generated pages.
Apart from these two, there is another function called getStaticPaths(). It is used to provide Next.js with a list of possible values for dynamic routes. For instance, if you have blog with 100 posts, then there is no need to create 100 routes manually.
Instead, you can create dynamic page route called [post].js inside the /pages directory (e.g., /pages/blog/[post].js). Then within the [post].js file, use the getStaticPaths() function to fetch the list of post slugs from the backend. Then return these values as an array. Next.js will then generate 100 different post files during build time.
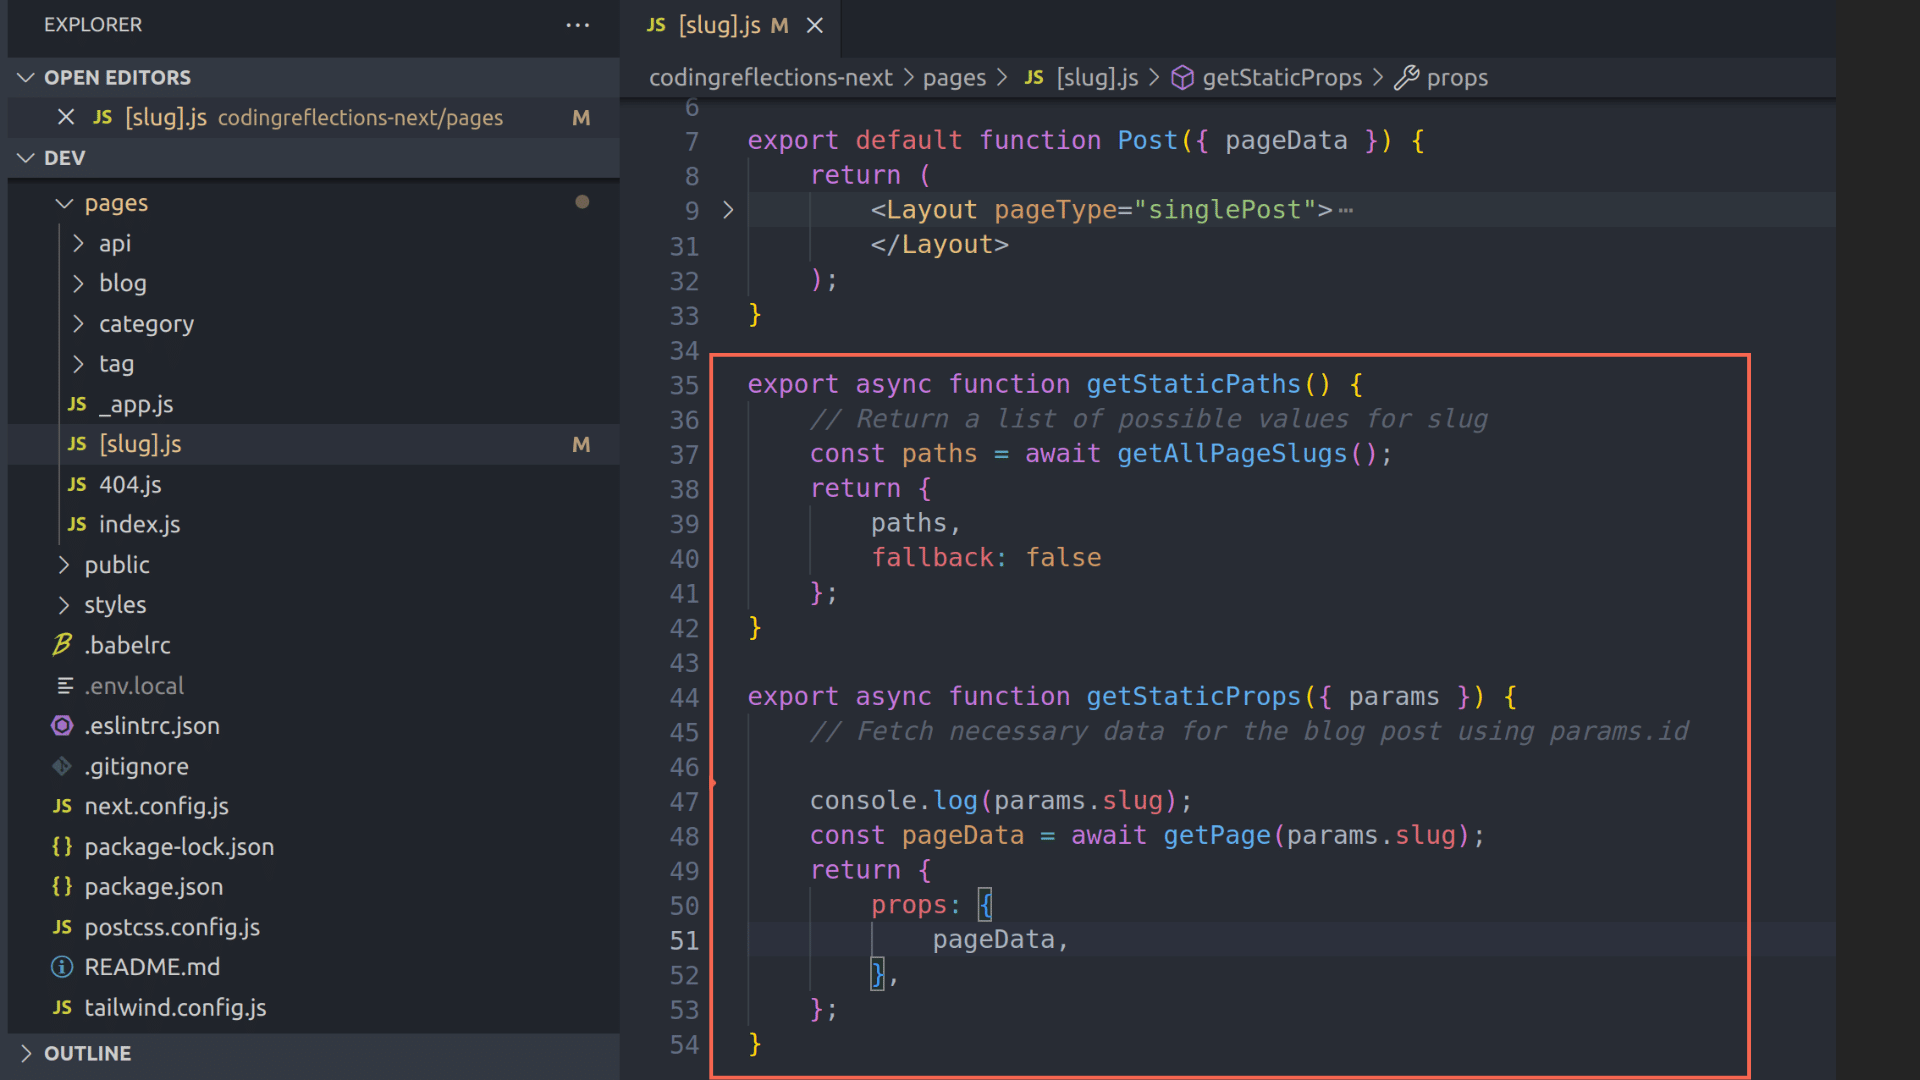
Note: these functions – getStaticProps(), getStaticPaths(), and getServerSideProps() run on the server only. It won’t be included in the Javascript file bundled for the client.
Code Splitting and Tree Shaking
In short, Next.js can split the code into server-side and client-side. This enables you to use server-only modules like ‘fs’ (File System module) on the server side. If you use a module only within the getStaticProps(), getStaticPaths(), or getServeSideProps(), then it won’t be bundled to the client. This process or removing unused code is called Tree Shaking.
Speaking of bundling, Next.js can split the code into smaller pieces, or chunks, for each page. Then loads these chunks only when required on a page. This feature is called Code-splitting.
Other Important Features of Next.js
The main advantage of using Next.js is that it provides a ton of features aiming to ease the process of creating production-ready application is short time.
Built-in SEO
Several SEO features are built into Next.js. For instance:
- Head component: This component allows you to inject SEO metadata into the pages head tag using JSX. For example, you can use it set the page’s title, meta description, meta robots, open graph tags, and so on.
- Link component: It’s a supercharged version of the the HTML anchor tag. When using the Link component instead of the plain anchor tag, Next.js will prefetch the links on a page. Users feel that the pages load faster when they click on a link. Also, due to the client side Javascript, page transitions will be almost instant. That means, the clicking on links loads the pages without refreshing the browser window.
- Image component: The Image component enables several features including lazy loading. It also ensures that the users receive the appropriate image sizes based on their device screen.
Fast Refresh to enable Live Editing
With the Fast Refresh enabled, you can view the edits made to the components almost instantly. There is no need to refresh the browser.
I think I forgot to mention that Next.js comes with dev mode, which spins up a local server on port 3000. It can be started using the command npm run dev.
If you are using React states to store component state data, you won’t lose them during Fast Refresh. Whereas with full page loads, state data will be lost.
Useful Error Messages
If you make any error in your code, Next.js gives handy error messages to help you correct them. The errors will be gone and the page will be Fast Refreshed when you correct them and save the file, which is super time saving.
Environment Variables
Most applications have to deal with sensitive data, such as database user, password, etc. Even for a Next.js powered headless WordPress site, you might want to store the JWT auth credentials.
For all such cases, you can store the values within the .env.local file located in the project root. Later you can access them in your code via process.env.
Note: never hardcode sensitive data in the application code.
Developing and Deploying Next.js Applications
Developing Next.js on the local machine
All you need to develop a Next.js application is Node.js installed on your local machine.
On the terminal, you can run the command:
npx create-next-app@latestThis command will create Next.js project in the current directory with all the necessary files like package.json, and folders like /pages, /api, /styles, etc (all discussed above).
To start a devlopment server, use the command:
npm run devThen access the site from http://localhost:3000.
To build the site, stop the dev server (press ctrl-c), then run the command:
npm run buildThis generates all the static files and stores them inside the /.next/static directory.
Once built, you can start the production server with:
npm run startAgain, the app can be accessed from http://localhost:3000.
How to deploy a Next.js application
The usual workflow starts with pushing the code to a remote Git repo (such as on GitHub).
- Then get a server (any VPS will do), install Node.js and Git.
- Clone the repository with git clone
- Run npm install command, followed by npm run build, then npm run start.
- By then the app will be live on port 3000 on the server.
- Then you can install a proxy server software like Nginx and make it stand in front of the Node.js server running on port 3000.
- Use the
proxy_passfeature make Nginx work as a reverse proxy for the Node.js app. - Add the necessary domain mappings, SSL installations, and things like that.
- Finally if you want, block the port 3000 from public access using a firewall like UFW.
Apart from that, you can also host Next.js on static site hosting services like Vercel, Netlify, etc, or app platforms like DigitalOcean Apps, AWS Amplify, etc.
You can even export a Next.js as a simple static site. In that case, there is no need for a Node.js server. However, some server-side features like redirections, API routes, and Incremental Static Regeneration won’t be supported.
Conclusion
I hope this article helped you to gain an understanding about the workings of Next.js.