Let me tell you how a software crash turned out to be a fruitful experience in the end.
Bumpy ride with OBS Studio
Last day I was about to record a screencast video on my Ubuntu desktop. As usual, I opened up OBS Studio, set the destination folder, and clicked the Record button. Everything was good.
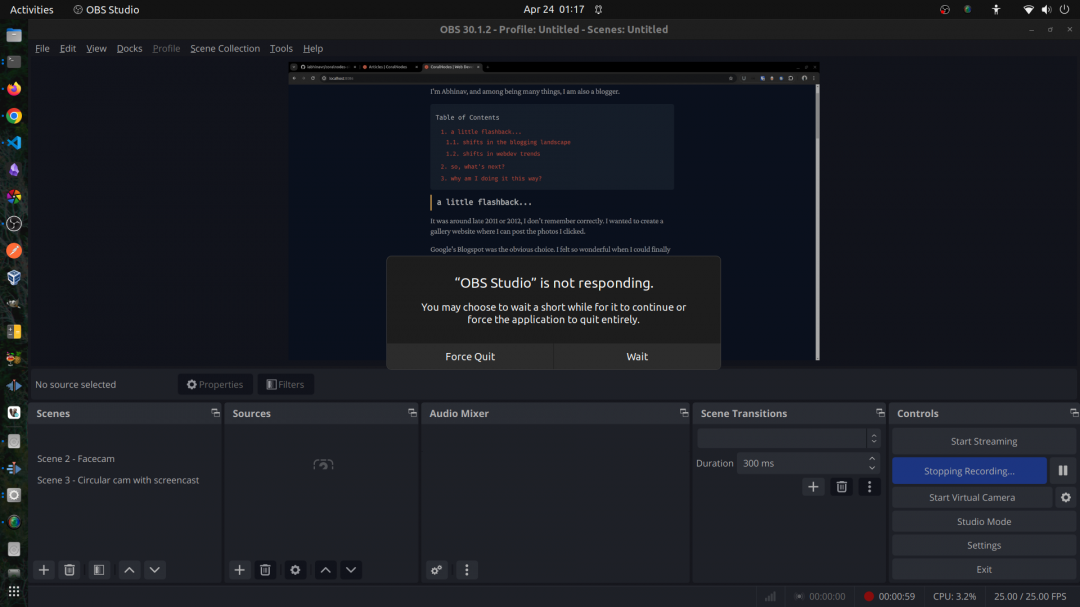
But when I pressed the 'Stop Recording' button, OBS got stuck.
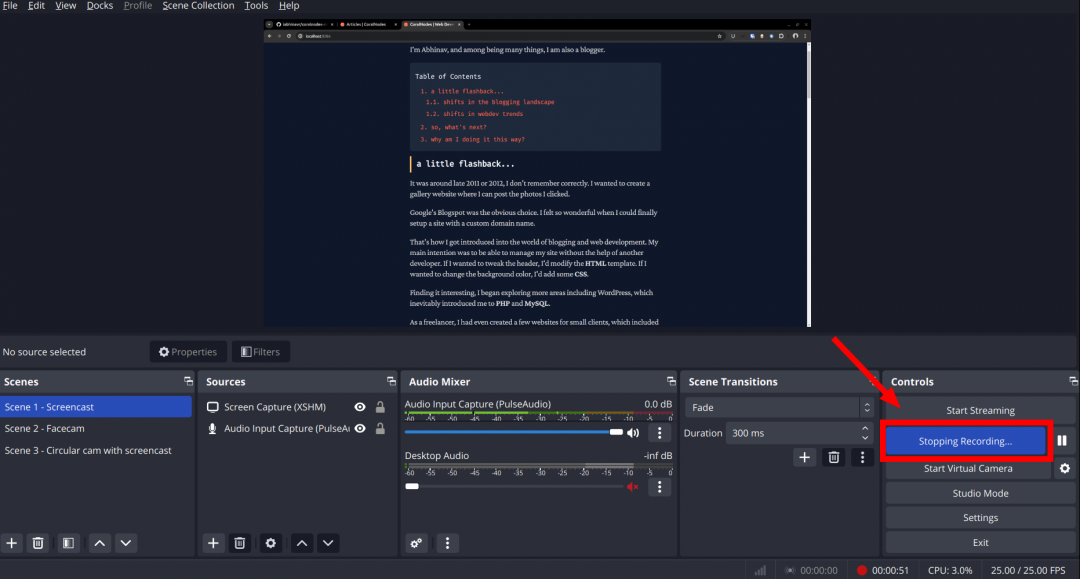
I tried it once again, and this time OBS crashed. I had to force quit the application to get back to normal.
I thought something might be wrong with my machine, driver or something. So I turned to Google to look for solutions.
And it seems there are other people who also encountered the same problem with OBS stuck at the 'Stop Recording...' screen.
Some people suggested to record in .mkv format (I was already doing that) so as not to lose the video file even if OBS crashes. Whereas some suggested the problem occurs with high frame rates and high CPU usage. But I was already recording at a very low 25fps with medium quality settings. So no issues there.
Or maybe OBS is an overkill for my use case - I only wanted to record a screen, or ocassionally connect a camera to record a facecam video.
SimpleScreenRecorder
After trying for a while, I decided to give up on OBS to look for alternatives. That's when I came across SimpleScreenRecorder.
Did a quick search in the Ubuntu repository:
sudo apt search simplescreenrecorderAnd it could be installed with:
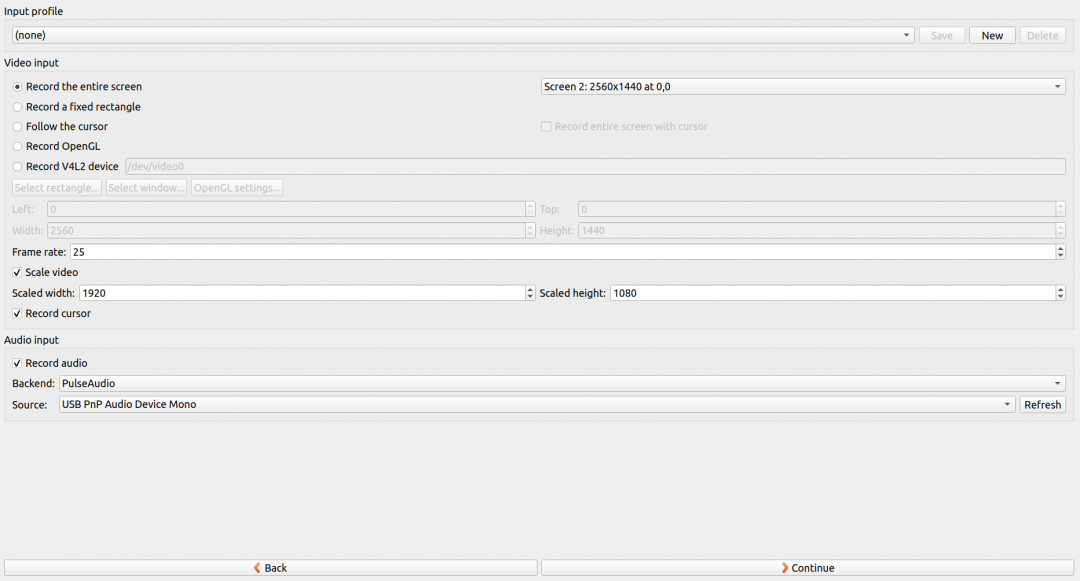
sudo apt install simplescreenrecorderAlthough the name says it is a 'simple' screen recorder, it comes with several features for most screen recording purposes. There are options to record an entire screen (with or without multiple monitors) or draw a rectangle to select the recording area, select frame rate, scale the output video, select the audio device etc.
Supported containers include Matroska (mkv), MP4, WebM, and OGG. You can also set the rate factor (CFR), audio frame rates, etc.
This is how the interface looks like:
Overall, it worked well and I was happy that I could record the screen without any hiccups.
But since I wanted to record in MKV and later convert to MP4 before editing, I had to find a way to remux the MKV recordings.
I used to do the remuxes with OBS itself. Whereas SimpleScreenRecorder doesn't have that feature.
That's when FFmpeg came to my mind.
Recording screen with FFmpeg
Earlier I had played with ffmpeg to trim video files, join clips together, and small tasks like that.
To my surprise, FFmpeg turns out to be quite powerful. Although it lacks a GUI like OBS or SimpleScreenRecorder, or any other screen recording apps, FFmpeg is capable of doing almost, if not more than what others can do.
It's a command line tool that comes with several options. Learning all of them can be quite time-consuming, though.
Anyways, here is the command I used to record the secondary monitor connected to my machine:
ffmpeg -f x11grab -framerate 30 -video_size 2560x1440 -i :0.0+0,0 -vf "scale=1920:1080:flags=lanczos" output.mkvLet's take a look at each of the options:
- -f: specifies the screen capture format. Here it is 'x11grab', since it is a linux machine.
- -framerate: here I've set the recording framerate to 30fps
- -video_size: size of the video or the resolution of the monitor you want to record. My second monitor is 2560x1440
- -i: the input source, that is the display-screen number you want to capture and its coordinates. Here it is :0.0+0,0. It's in the format :display_no.screen_no+x_offset,y_offset.
- -vf: I wanted to scale the output video down to 1920x1080
Note that it needed a bit of trial and error to figure out the display and screen numbers. For me both were zero.
Here is what xrandr gave:
$ xrandr --listmonitors
Monitors: 2
 0: +*DVI-D-0 1920/476x1080/268+2560+0  DVI-D-0
 1: +HDMI-0 2560/527x1440/296+0+0  HDMI-0
To record the HDMI-0 (the one on the left), I set -video_size 2560x1440 -i :0.0+0,0 while for the DVI-D-0 monitor (right side), it was -video_size 1920x1080 -i :0.0+2560,0. DVI-D-0 was the primary monitor (placed on the right side), HDMI-0 was the secondary monitor (left side)
Recording audio
In addition to recording the screen video, most of us want to capture the audio as well.
In my case, it was a USB microphone. The following command gives you a list of audio devices connected to your machine:
pactl list sourcesThe USB mic was an alsa input device. To record just the audio, you can:
ffmpeg -f alsa -i default output.wavNote the -i option is set to default. I had set the USB mic as the default audio input device under Ubuntu Sound settings
I want to record both the video and audio in one file. So I modified the above command with extra options:
ffmpeg -f x11grab -framerate 30 -video_size 2560x1440 -i :0.0+0,0 -f alsa -i default -vf "scale=1920:1080:flags=lanczos" output.mkvConclusion
Although OBS gave an unncessary delay, it turned out to be useful. I could discover something more powerful. Also, FFmpeg was much more performant, maybe because it lacks a complex GUI.
If not afraid of the command line and willing to learn a few commands, FFmpeg can be a great tool for many video-related tasks.